Improvised gluten-free muffins (basic recipe)

improvised gluten-free pear muffins

improvised gluten-free pear muffins

I remember the time when I was really scared to start gluten-free baking because it seemed so complicated, so many types of flour, so easy for things to go wrong, for the baking to fail. A couple of weeks ago, I baked some muffins (if you can call them that) without following any gluten-free recipe book and amazingly, the product was edible!

All I did was to try a direct substition of wheat flour with a gluten-free flour blend in my original basic muffin recipe. Yes, the very first basic muffin recipe, which I subsequently stopped using when I found basic recipe no. 2 gave better results. Basic muffin recipe no. 1 is so easy that you can easily by heart:

2 cups flour
1 cup milk/liquid
1/4 cup oil/butter
1 egg (2 , if you prefer)
1 tsp baking powder
other ingredients of choice – e.g. 1 chopped apple, handful of nuts/dried fruit etc.

I used exactly those quantities together with a few large chunks of tinned pears, and made up the 1 cup liquid with half milk and half pear juice from the tin. Apart from the pears and pear juice, no added sugar. (If you are avoiding salicylates, remember to choose pears in syrup as commercial pear juice contains the peel which has salicylates. Of course if you are on an anti-candida diet, the syrup is probably worse!)

The gluten-free flour blend is the one I described earlier:

8oz/225g brown rice flour
8oz/225g tapioca starch
8oz/225g soy flour

No xanthan gum, no gelatine.

The batter was extremely wet, but I decided to go ahead without adding extra flour. The consistency (and eventual effect) reminded on a crazy improvisation attempt when I dumped a load of mashed pumpkin into a gluten-free sponge cake recipe, thereby completely altering the ratio of liquid to other ingredients — a crazy attempt which I did not blog about because I can’t even remember exactly what I did (brain must have gone on strike, hence giving rise to the mad improvisation to begin with); started out being utterly disappointed with the result and subsequently very pleased when put aside my preconceptions and realised the texture was quite appealing and the taste pretty good.

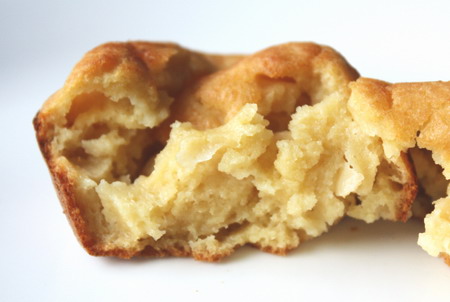
The result:

It looked beautiful at the end of baking, but collapsed as it cooled after coming out of the oven, just as this gluten-free bean bread did. I’ve discovered the quick bread gluten-free recipe that doesn’t sink is this one that uses gelatine as well.

Taste-wise, I was very pleased although visitors to my home who tasted a bite responded only with a grimace masquerading as a polite smile :). Texture-wise, I’ll repeat what I’ve said in my other gluten-free baking entries; it reminds me of Southeast Asian kueh or steamed cakes, soft and very close-textured, no ‘crumb’, kind of squishy.

The overall effect of the non-wheat taste and texture is certainly very reminiscent of local desserts, so perhaps if I dropped names like ‘muffin’ or ‘cake’ and called it kueh, people would have different expectations and not react so negatively towards my gluten-free baking!

Gluten-free, yeast-free bean bread

Today I tried out the basic yeast-free bread recipe from The Gluten-Free Gourmet Bakes Bread by Bette Hagman, using the Four Flour Bean Mix described in my previous posting with the standard supermarket flours using in Indian cooking (Mustafa being the only supermarket I know that stocks them, though!).

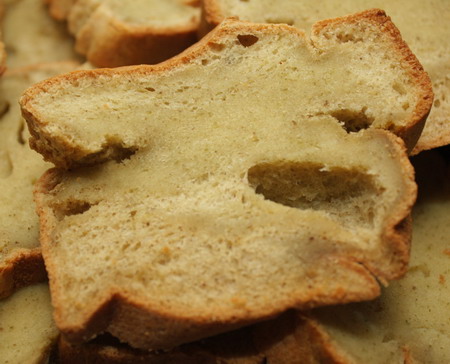
The result was rather uneven: some parts did not rise much – the very smooth, close-textured parts – and other parts had huge air bubbles.

However, taste-wise and in terms of ‘mouth-feel’, I’m pleasantly surprised! The very green smell from the green bean flour disappeared after baking, and the bread was springy to the touch, much like real bread (despite the cake-like appearance). Actually, the texture reminds me very much of kueh lapis!

I tried it with a variety of savoury and sweet toppings as well as plain with butter, and it tasted fine every time. I couldn’t stop eating… how wonderful to be able to eat ‘bread’ and not be worrying about exceeding my wheat & gluten limit.

The recipe for a small loaf:

DRY INGREDIENTS

2 cups Four Flour Bean Mix : I used 1/3 part chickpea flour, 1/3 part green bean flour, 1/3 part sorghum flour, 1 part cornstarch, 1 part tapioca starch
1 1/2 tsp Xanthan gum
3 Tbs brown sugar [which I reduced to 2 Tbs – still rather sweet]
1/2 tsp baking soda
2 tsp baking powder

1 tsp Egg Replacer [omitted; Hagman uses this to provided additional protein and leavening power]
1/2 tsp salt

WET INGREDIENTS

Eggs – 2 plus 1 white [I used 3 small whole eggs, also because I omitted the Egg Replacer]
2 Tbs melted butter [replaced with ghee as I was too lazy to melt butter!]
1 Tbs honey [replaced with light argave syrup]
3/4 cup buttermilk [used substitute]
approx 1/3 cup water [used much, much less]

[Hagman also uses optional dough enhancer, which I have omitted completely here.]

Preheat oven to 180°C. Grease loaf pan(s) and dust lightly with rice flour.

Whisk together dry ingredients.

In a large bowl, beat eggs and egg white(s). Add melted butter, honey and buttermilk. Blend with mixer on low speed.

Add dry ingredients and continue to blend on low speed.

Add ‘sufficient water to make the dough the consistency of cake batter.’ This was the hard part! What is the correct consistency? I’ve seen a whole range of consistencies of cake batters. Anyway, using my judgement, I only needed to add about a tablespoon of water. The batter was strange-looking because of all those sticky flours, the cornstarch and tapioca starch, not at all like cake batter.

Beat 1 minute on high.

Spoon into prepared pans and bake for 55 to 60 mins, covering with aluminum foil after 30 mins.

Problems

* The bread rose tremendously in the oven the collapsed afterwards, which suggests that I should reduce the amount of leavening agent next time.

* The texture was very uneven, it did not affect the taste, but certainly is less than ideal. Bette Hagman constantly gives strict instructions to follow recipes exactly as substituting ingredients may end up with a different result. As usual, I can never follow a recipe precisely so I guess I will have to keep experimenting.

* Hagman also suggests that overly dense texture might be due too much liquid, and from my experience with muffins (which is what this essentially is – a muffin method, dry + wet ingredients then mix) is that it could also be case of over-mixing. I might just make this by hand next time; the mixer is unecessary and might have contributed to the over-mixing.

Verdict

Whatever the problems, I was really pleased with the result. I fear the little test loaf in the freezer won’t last long at all. Am definitely making this again, and at double the quantity :).

Here are Hagman’s quantities for a large loaf:

DRY INGREDIENTS
Four Flour Bean Mix (see above) – 4 cups
Xantham gum – 3 tsp
Brown sugar – 1/3 cup
Baking soda – 1 tsp
Baking powder – 1 rounded tablespoon
Egg replacer – 2 tsp
Salt – 1 tsp

WET INGREDIENTS
Eggs – 3 plus 2 whites
Butter, melted – 6 Tbs
Honey – 2 Tbs
Buttermilk – 1 1/2 cups
Water (more or less) – 1/2 cup

31/10/08 Update: experimented with this recipe a second time, making some tweaks and getting a much better result. Read more here: Improved recipe for gluten-free, yeast-free bean bread.