Improvised gluten-free muffins (basic recipe)

improvised gluten-free pear muffins

improvised gluten-free pear muffins

I remember the time when I was really scared to start gluten-free baking because it seemed so complicated, so many types of flour, so easy for things to go wrong, for the baking to fail. A couple of weeks ago, I baked some muffins (if you can call them that) without following any gluten-free recipe book and amazingly, the product was edible!

All I did was to try a direct substition of wheat flour with a gluten-free flour blend in my original basic muffin recipe. Yes, the very first basic muffin recipe, which I subsequently stopped using when I found basic recipe no. 2 gave better results. Basic muffin recipe no. 1 is so easy that you can easily by heart:

2 cups flour
1 cup milk/liquid
1/4 cup oil/butter
1 egg (2 , if you prefer)
1 tsp baking powder
other ingredients of choice – e.g. 1 chopped apple, handful of nuts/dried fruit etc.

I used exactly those quantities together with a few large chunks of tinned pears, and made up the 1 cup liquid with half milk and half pear juice from the tin. Apart from the pears and pear juice, no added sugar. (If you are avoiding salicylates, remember to choose pears in syrup as commercial pear juice contains the peel which has salicylates. Of course if you are on an anti-candida diet, the syrup is probably worse!)

The gluten-free flour blend is the one I described earlier:

8oz/225g brown rice flour
8oz/225g tapioca starch
8oz/225g soy flour

No xanthan gum, no gelatine.

The batter was extremely wet, but I decided to go ahead without adding extra flour. The consistency (and eventual effect) reminded on a crazy improvisation attempt when I dumped a load of mashed pumpkin into a gluten-free sponge cake recipe, thereby completely altering the ratio of liquid to other ingredients — a crazy attempt which I did not blog about because I can’t even remember exactly what I did (brain must have gone on strike, hence giving rise to the mad improvisation to begin with); started out being utterly disappointed with the result and subsequently very pleased when put aside my preconceptions and realised the texture was quite appealing and the taste pretty good.

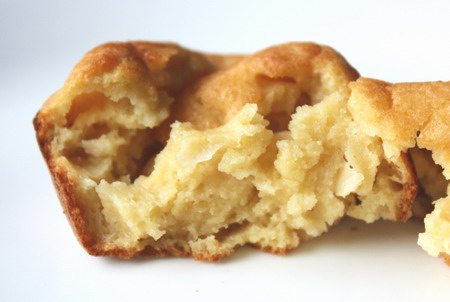
The result:

It looked beautiful at the end of baking, but collapsed as it cooled after coming out of the oven, just as this gluten-free bean bread did. I’ve discovered the quick bread gluten-free recipe that doesn’t sink is this one that uses gelatine as well.

Taste-wise, I was very pleased although visitors to my home who tasted a bite responded only with a grimace masquerading as a polite smile :). Texture-wise, I’ll repeat what I’ve said in my other gluten-free baking entries; it reminds me of Southeast Asian kueh or steamed cakes, soft and very close-textured, no ‘crumb’, kind of squishy.

The overall effect of the non-wheat taste and texture is certainly very reminiscent of local desserts, so perhaps if I dropped names like ‘muffin’ or ‘cake’ and called it kueh, people would have different expectations and not react so negatively towards my gluten-free baking!

Considering making pickled vegetables

As long-standing readers here may have noticed, I like the idea of making from scratch at home products which are often bought as ready-made commercial products. I’ve had a reasonable amount of success with soya bean milk, tofu and salted eggs, which are all very easy.

I’ve also considered making soya sauce at home. While it can be done, as I mentioned in my earlier posting, I’ve decided not to try (at least for now) after chatting to a food scientist who used to work at Kikkoman. During the commercial production process at Kikkoman factories, there is assiduous testing to make sure that the fermentation process does not attract toxic microbes instead of the ‘right’ kind of bacteria, which can easily happen. I’ve also heard how difficult it is to make tempeh at home, and I assume it’s partly for those same reasons.

Another type of food I thought of making at home is Chinese pickled vegetables: mui choy, chye poh, kiam chye — all the things that would give the right ‘kick’ to my somewhat bland dishes. Today’s Sunday Times food question column by Chris Tan addressed this precise issue. The bad news is:

They are not as easy to make as they might seem, requiring successive rounds of drying, seasoning, salting, brining or steaming. These methods may look simple or crude but they are very sensitive to the quality of the starting ingredients, the ambient humidity and temperature as well as the microbes naturally present in the immediate environment.Hence, an experienced eye is needed to tell if the fermentation or preservation is proceeding correctly. Doing this kind of multiple-stage preserving at home is very tricky, frequently entailing much trial and error. Therefore, nowadays most people are content to leave it to the specialists.

The good news is that “many Asian cuisines have easy recipes for mildly sour, briefly fermented pickled greens that are designed to be made and consumed within a few days.” Examples of pickled gai choy, which is a kind of mustard green, include Laotian som pak, Filipino burung mastasa and Vietnamese cai chua or dua chua.

The advice from Chris Tan concludes with this advice:

The Japanese pickling tradition also has many quick pickle recipes. For a good introduction to methods and ingredients, I recommend the book Tsukemono: Japanese Pickled Vegetables by Kay Shimizu.

I don’t have that particular title, but have already been pouring over TSUKEMONO―Japanese Pickling Recipes (Quick&Easy) which is part of my collection of food books. Unfortunately, I’m not familiar with how the different types of Japanese pickles taste and I’m not a big enough fan of pickles in general to go all out on experimenting. I wonder if quick pickles will taste more like nonya acar, rather than anything like chye poh…?

for San Francisco readers: Asian Culinary Forum (10-12 Oct, 2008)

For those living in the San Francisco area, I just heard about this event, the Asian Culinary Forum.

Asian Food Beyond Borders
Friday – Sunday, October 10 – 12, 2008

To celebrate our 2008 theme, “Asian Food Beyond Borders,” ACF is presenting an entire weekend of exciting classes, tours, workshops and panel discussions for your enjoyment. Choose your heart’s desire from our extensive a la carte menu of educational events.

To attend any of the Friday and Saturday classes below, register online securely and conveniently. Learn more about our guest instructors, speakers, and presenters on their bio page.

Friday, October 10

The Six Asian Flavors
5:30 – 7:30 pm,  SF Ferry Building

Saturday, October 11

Morning

Chinatown Culinary Walk  *** SOLD OUT ***
9:30 am – 1:30 pm, Chinatown

Chutneys, Kimchi, and Sambal
10:30 am – 1:00 pm, Sur La Table, Maiden Lane

The Politics and Practicalities of Rice
10:00 am – 12:00 pm, SF Ferry Building

Afternoon

Master Wine and Food Pairing
1:30 – 3:30 pm, Le Colonial

Meals, Meaning, and Memory in Asian Diasporas
1:30 – 3:30 pm, SF Ferry Building

What is This? Experts Deciphering the Unfamiliar
1:30 – 3:30 pm, SF Ferry Building

Delights of South India
3:00 – 5:30 pm, Sur La Table, Maiden Lane

Sunday, October 12

ACF 2008 Symposium: Asian Food Beyond Borders
8:30 am – 5:30 pm, Ferry Building

Chef Chan at the National Museum & cooking lectures/classes

I’ve been trying out dim sum recipes (steamed radish cake, water chestnut fritters and chewy pumpkin cake) from the cookbook by chef, Chan Chen Hei, without any idea who he is.

But I’ve just discovered that he’s opened a new restaurant at the National Museum of Singapore (the same place with this food history exhibit that features traditional coconut graters among other things). Not that I’ll be able to try it out… I’ve stayed far, far away from any kind of Chinese restaurant after single-mouthful tasters left me feeling unwell for an entire week, on more than one occasion.

Anyway, Chef Chan will be co-presenting a lecture at the museum on ‘Ancient Chinese Food’ with Huang Zhuolun 黃卓倫, the food writer from Lianhe Zaobao, on Sat, 20 Sep 08 from 4-5pm. Get the full details at the National Museum website‘s section on Lectures on Food & Culture. There are other sessions on tea (16 Aug) and chocolate (29 Aug) as well.

If you’re into learning about food and cooking but relate more to organic, healthy and holistic instead, the hands-on classes on tofu & okara, fermented foods, raw food, vegetarian cooking, baking bread (no oven necessary), traditional Chinese snacks and spreads made from nuts, seeds & fruits, then the sessions at Wholesome Living look quite exciting.

I’ve not been for any food classes before so if have any experiences to share, do leave a comment :).

Another word on tofu coagulants

This homemade tofu thing is getting complicated.

Yesterday, I came across this information from Wholesome Living, an organic shop in Singapore that conducts all sorts of cooking workshops:

Commercial bean curds contain chemical substances such as bleaching agent, de-foaming agent, preservatives and coagulant (calcium sulfate a.k.a. gypsum). Commercial tofu manufacturers usually utilize calcium sulfate as a coagulant and marketing it as high calcium food to mislead consumers that it is a good source of calcium to prevent osteoporosis. In fact, this inorganic calcium will cause various health problems such as renal stone problems and so forth. Furthermore from the TCM (Traditional Chinese Medicine) perspective, consuming too much commercial tofu will make your body too ‘YING’.

[Wholesome Living conducts a Tofu, Soy Milk & Okara 2-session workshop that teaches tofu-making with non-mineral coagulants.]

Various websites, especially those promoting particular brands of calcium supplements based on water-soluble organic calcium (e.g. calcium aspartate etc.), support these points; see here, here and here.

On the TCM view of tofu, Paul Pitchford’s fantastic book, Healing with Wholefoods, elaborates:

For most people, its yin, cooling quality needs to be altered by thorough cooking; adding warming spices such as ginger is particularly helpful for cold persons. . . . Eating massive amounts of tofu regularly (as some Americans do) can contribute to kidney-adrenal weakness, loss and graying of hair, impotence, frigidity and decrease in sexual sensitivity.

At the same time, calcium sulphate is the oldest tofu coagulant used in China, with 2000 years of history (see here).

According to this Singapore-oriented discussion thread from 2005, Phoon Huat stopped selling gypsum (sometimes mistakenly equated with borax) as it was banned from sale, and therefore began stocking Glucono delta-lactone/GDL instead.

(GDL), which is naturally found in honey, fruit juices and wine, is the coagulant used for making silken tofu. As the Wholesome Living workshop teaches the making of silken tofu, I suspect GDL is the ‘non-mineral coagulant’ being used. The action of GDL is different from nigari & gypsum type coagulants as it works as an acid, not as a salt (see Asian Foods: Science and Technology by Catharina Yung-Kang, Wang Ang, KeShun Liu, Yao-Wen Huang).

Sounds like GDL is the way to go, especially for soft tofu for 豆花 douhua/tau foo fa/tau huay.

Read my previous posts on tofu-making:
Coagulants for homemade tofu
Making tofu at home
Making tofu at home P.S.

Making tofu at home P.S.

Sorry, in the last post, I missed out a whole bunch of great links with more photos, tips and information about making tofu at home.

The first is this super set of photos & instructions from Chow.com. The best thing about this is that it provides a cheap & easy solution to the problem of finding at tofu box & press! I’ve excerpted the instructions on how to make one from a used milk carton:

tofu-press-1.jpg

tofu-press-2.jpg

(See the original Chow.com page here.)
Personally, I would use a fruit juice carton instead as milk smells tend to linger and aren’t easily so washed off the carton.

Here are some others who’ve tried making tofu:
http://www.bryannaclarkgrogan.com/page/page/3009045.htm [excellent step-by-step instructions and tips with photos]
http://www.codecooker.com/veggiewrangler/tofu/step1.htm [great step-by-step pics and tips]
http://mmm-yoso.typepad.com/mmmyoso/2006/09/tofu.html [has photo of a bottle of commercial Japanese nigari]
http://www.selfsufficientish.com/soyamilk.htm [no photos, very detailed write-up]
http://www.burntmouth.com/2007/10/home-made-seasoned-tofu.html [tofu & spicy-foods-fan, Zlamushka, makes flavoured tofu with spices, both savoury and sweet]
http://veganfeastkitchen.blogspot.com/2007/06/gourmet-tofu-from-your-own-kitchen.html [sage, leek & dried wild mushroom tofu]
http://veganfeastkitchen.blogspot.com/2007/07/update-on-mushroom-leek-gourmet-tofu.html [tomato, artichoke, garlic, basil tofu]

What interests me most are these recipes & tips for making the kind of tofu my whole family loves to eat, the Chinese tofu pudding dessert, 豆花 douhua/tau foo fa /tau huay:
http://www.soya.be/forum/viewtopic.php?p=4297
http://chowtimes.com/2006/03/21/sweet-soy-pudding-tou-foo-fa/ [includes photo of commercial packaged gypsum (calcium sulphate) powder from Hong Kong]
http://www.mycookinghut.com/2007/07/02/craving-for-douhuadau-fu-fa/ [a modified version, using gelatine instead of gypsum]

There seems to be less information on the internet about making your own douhua/tau foo fa. My guess is that it’s because it’s not a tofu dish common in the west and most people making their own tofu are those who have difficulty buying it where they live. On the other hand, douhua is easily available in Chinese communities everywhere, and instead of DIY instructions, you’ll find tons of web discussions on where to find the best fresh douhua stall! For the uninitiated, this article and its discussion board is a good primer and discusses douhua in different Asian cultures.

Speaking of douhua stalls, I’ve long wondered what goes into the syrup they serve; why is it always that orange colour? I tend to have as little of it as possible, sometimes none. Singapore douha hawkers don’t bat an eyelid when I ask for no syrup, but in Taiwan, one stallholder engaged me in a prolonged discussion and even customers sitting at the stall joined in to question my strange eating habits!

Traditional coconut graters

Some time back I wrote about different types of graters, especially those used for grating coconut. [Also read here how we make coconut milk at home.]

One thing that fascinated me was the various styles of traditional coconut graters used in different cultures, and on a recent trip to the National Museum of Singapore, I was pleasantly surprised to find a display of traditional coconut graters.

Museum Graters_6048_450.jpg

You can see here a couple of stool-type graters in the foreground and at the back, handheld versions, one of which looks rather phallic! Partially obscured on the right-hand side towards the back is a suction-style grater similar to the one I described in my previous posting.

This display is found inside the Food gallery, which is one of the four “Living Galleries” and is free entry from 6-8pm daily :).

NM Food Gallery A-1.jpg
NM Food Gallery B-1.jpg

Natural food colourings II

You may have already seen my earlier posting on natural food colourings here.

Since then, I came across this interesting video podcast from Curbly- DIY Design Community on natural colourings for Easter eggs, which suggests:

• For blue, use red cabbage
• For red, try whole beets (not canned), cherries, or cranberries
• For light green, use spinach or fresh green herbs
• For tan, brew some strong coffee, tea, or a handful of cumin seeds
• For yellow, try turmeric (a spice) and yellow onion skins
• For olive green, use red onion skins (the color is produced by a reaction with the vinegar)
• For purple, grape juice or frozen blueberries.

Moving from American Easter eggs to Japanese lunchboxes, Maki of Just Bento has also written on natural ways to add colour to your food, based on suggestions from the bento-making community via Japanese-language websites such as Bentobako.net.

In summary, some of the foods used are:

Orange: salmon, carrot, paprika
Pink: ume vinegar, sakuraebi (small dried shrimp), red cabbage liquid with lemon juice
Purple: red cabbage liquid, purple potato powder
Blue: red cabbage juice with baking soda, purple potato powder, pickled eggplant liquid
Yellow: mashed kobocha (Japanese pumpkin), curry powder, turmeric, egg yolk
Green: mashed up edamame beans, peas broccoli or spinach
Brown: inarizushi skins, dark soya sauce
Black: nori seaweed
Grey: shirasuboshi (tiny little semi-dried fish)

And also how red cabbage prepared in different ways can produce purple, blue, red and brown colours! For full instructions, go to the original Just Bento post.

Steamed radish cake 蘿蔔糕

radish-lot-bak-gou-4501.jpg

Ever since I started experimenting with different foods in an attempt at food rotation, I’ve been thinking of cooking this dish. It’s made from Chinese white radish, also known as daikon (and most confusingly, can be called ‘carrot’ when translated into English, as I’ve noted here).

What held me up was trying to think of substitutes for the usual preserved meats and dried products that usually go into this dish: laap cheong Chinese sausages, laap yok waxed pork, dried shrimps, dried mushrooms. Without the seasoning of oyster sauce, soya sauce and sugar, and no flavourful ingredients I wasn’t sure how this dish would work at all.

In the end I just went ahead and made it absolutely plain and believe it or not, it was absolutely delicious! There are no fillings in this lor bak gou at all, and no seasoning apart from a tiny pinch of salt, but the familiar taste is unmistakably that of lor bak gou .

Everything is in the additional toppings which can be adjusted to suit individual taste, so those family members who want to load up on laap cheong and bottled chilli sauce can do so as well, leaving the rest of us to enjoy this in a more simple fashion.

The toppings shown in the photo are chopped spring onion, homemade fried shallots, sesame seed furikake and sesame oil — my favourite way to garnish this basic lor bak gou.

This dish is suitable for bento, and the toppings can be packed into dedicated bento condiments containers, or even just wrapped up in folded aluminium foil. Personally, I prefer to eat lor bak gou warm and I didn’t try it in any bento this time round.

When I compared different recipes, the interesting thing was that they all used a different combination of flours in very different quantities. For example, for approx. 600g of radish:
a) 450g rice flour + 50g tapioca flour
b) 1400g rice flour + 80g tapioca flour
c) 450g rice flour + 1.5 Tbs corn flour + 1.5 Tbs wheat starch
d) 280g rice flour + 40g cornflour
e) 200g rice flour + 40g wheat starch
f) 150g rice flour

[To find out more about these types of flours, have a look at my info page on flours for Chinese & Japanese snacks.]

I decided to go with the quantities in what appears to be the most reliable of my cookbooks, Dim Sum by Chan Chen Hei, a renown chef who’s worked at top restaurants and hotels in Hong Kong and Singapore. The method was adapted from combining instructions in various cookbooks.
Ingredients

500g-600g white radish
200g rice flour
40g wheat starch
1 litre water
salt to taste

1) Peel and shred the radish (using a ceramic peeler and ceramic julienne slicer, if you have them ^_^). You can also chop the radish into strips, it’s said that these larger chunks give a better texture to the final dish.

2) Mix the flours with just enough water to form a smooth, liquid paste.

3) Pour the remaining water into a pot, put in the radish, season with salt to taste, bring to the boil and cook until it has turned transparent and soft.

4) Reduce the heat to low or turn off the heat completely and stir in the flour mixture. Combine thoroughly until thick and sticky.

5) Grease a container to hold the radish batter for steaming. If you wish, you can line the container with cling film to make it easier to remove the cooked radish cake intact. You can use any dish suitable for steaming, or even a disposable aluminium cake tin (cling film not needed, because you can transport, store and serve the radish cake in it, no need to remove the cooked product from the container) . In my experience, try to avoid anything that’s too thick and heavy or which does not conduct heat well.

6) Pour in radish mixture and smoothen the top. Preheat the steamer and steam on high heat for at least 30 minutes. It could take as long as 1hr, depending in the quantity and shape of the radish cake. Test the middle with skewer or chopstick; if it doesn’t stick, the dish is done.

There will be a watery liquid on the surface. Just leave it as it will be absorbed as the radish cake cools and prevents the surface from becoming dried out and cracked.

7) As the cake cools, it will firm up. You can then slice, garnish and serve.

Optionally, you can pan fry the slices until brown and fragrant, then garnish and serve.

Personally, I think this tastes best when hot. I kept it in the fridge and heated it up before eating. However, I found that it did not microwave very well. The outer edges would be hot and the centre still hard and cold, so I ended up having to reheat by steaming. Which isn’t really a bad thing since we should try to avoid the additional EMF exposure from microwaves — not to mention the questionable effect eating microwaved food (read more here and here), if we weren’t already so addicted to their convenience.

We have an electric stove at home, and it’s slower to heat up and cool down than a gas stove. My personal method to speed up the steaming/boiling is as follows:
1) Boil sufficient water for steaming in the kettle.
2) Whilst the kettle is boiling, heat up the pot on the stove by putting just enough water to cover the base.
3) When kettle has boiled, pour contents into the pot, which should be at boiling point by now.
4) Invest in good quality pots as the heat conduction is noticeably superior and the contents will boil faster.

16/4/08 Update: Just found this video of a cooking show demonstrating how to make traditional Hong Kong-style steamed radish cake, which is characterised by Chinese sausages (in Taiwanese dialect with Chinese subtitles).

13/6/08 Update: see also my steamed Chinese yam cake.

Q: When is a yam not a yam?

A: When it’s a sweet potato or a taro!

I have recently discovered that I have been using imprecise names, and probably confused some of you in other parts of the world where different words are used.

For example, I learnt from reading this that in America, what are called ‘yams’ are really varieties of sweet potato which have a moist texture.

In contrast, I have been referring to taro as ‘yam’, basically equating anything we call in Chinese yu4tou3 芋頭 with ‘yam’. While one could put it down to a combination of my poor plant-recognition skills and half-baked linguistic ability, I’m not the only person who equates yu4tou3 芋頭 and ‘yam’; so does this bilingual food blog from Singapore. And after all, we call steamed 芋頭糕 yu4tou2gao1 [Mandarin]/ wu tao gou [Cantonese], ‘Yam Cake’ (and I made some Shredded Yam Cake 芋絲餅). Lily’s Wai Sek Hong, a Malaysian writing from America helps to unravel the puzzle with this explanation:

In Malaysia, ‘Woo Tau’ in Cantonese is called YAM but it is TARO here in the States and yam is sweet potato.

Trying to look for bilingual dictionary definitions can be hugely confusing too. On the Chinese-language internet, the most common list of food words provides this translation:

yam — shan1yu4 — 山芋
taro — yu4tou2 — 芋头

On the other hand, my US-produced dictionary follows the American usage:

sweet potato — shan1yu4 — 山芋
yam — shu3 — 薯

[How, er, not helpful: ma3ling2shu3 馬鈴 = potato; mu4shu3 木薯 = tapioca; and to Southeast Asian Chinese, fan1shu3= sweet potato, following Cantonese usage, cf. China, where sweet potatoes are called di4gua1 地瓜].

But back to 山芋 (shan1yu4 in Mandarin). When pronounced in Japanese, it’s yamaimo — that very special ingredient needed to make okonomiyaki! Yamaimo is usually translated into English as ‘mountain yam’.

To get to the root (no pun intended!) of the issue, we’ll have to look at the botanical names:
yam — genus: Dioscorea
taro — genus: Colocasia
sweet potato — genus: Ipomoea

While the Colocasia genus comprises only six to eight different types of flowering plants, there are 600 varieties of Dioscorea, of which the edible ones are known as yams. The genus Ipomoea also has over 500 species, some of which we commonly recognise as the morning glory flower, and others in the form of edible tubers, i.e. sweet potatoes.

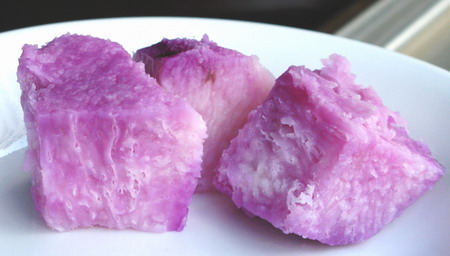
Within the Dioscorea family, the species of edible tubers we call yams come in a mind-boggling diversity. From the long, cream-coloured, stick-like Chinese/Japanese mountain yam 山芋, to huge, dark brown, ugly, knobly lumps. But don’t be put off by the external appearance, a yam that looked like a piece of elephant dung on the outside, turned out like this:

Purple Yam

Aren’t the variegated colours beautiful? I have no idea what the correct name for this kind of yam is, but here’s a photo of the whole tuber from a Japanese blog that refers to it as murasaki yamaimo 紫山芋, ‘purple yam’. Unfortunately, to me this was rather bland, taste-wise, and too dry and powdery in texture for my liking (think of powdery potatoes, the kind used for baked potatoes, as compared to the smooth, waxy kind used for roast potatoes).

Previously, I was also wasthe misconception that yams are always purple and anything purple is a yam. After all, yam-flavoured ice cream is always purple isn’t it? Of course that’s just food colouring, but it is based on the perception that yams are purple. It was only when I bought purple sweet potatoes for these two-coloured sweet potato balls and this purple soup, did I realise that yams do not have a monopoly on this rich colour.

Here’s a photo from Nakashima Farms, a Californian-Japanese producer of sweet potatoes, showing the four varieties they sell. I was amazed and impressed by the different coloured flesh (yikes! no wonder the sweet potato I bought didn’t look like the one in the recipe book!).

Sweet Potatoes Colours

The purple sweet potato shown here is known as the Okinawan variety from Japan. I’m not sure whether the ones I got for the two-coloured sweet potato balls and purple soup were also the Okinawan variety, but they were labelled as originating from Thailand (purchased in Sheng Siong).

Right now, my favourite kind is the Japanese variety, satsumaimo さつまいも, shown on the extreme left (or see photo here). It’s purple on the outside but not on the inside ^_^. The pale yellow flesh is sweet and very smooth. In contrast, the typical local sweet potatoes, which are orange both outside and within, I’ve found are extremely fibrous, making the texture unpleasant when eating them whole, and necessitating a lot of sieving if you want to use them in recipes like the two-coloured sweet potato balls.

Satsumaimo from Japan can be rather pricey, so an alternative is are the ‘Japanese sweet potatoes’ grown in Vietnam. They are usually very small – just the right size for a snack bento – and are often sold in bags at the supermarket. The other day, I bought a full-sized satsumaimo for the first time, and found it much more satisfying than the tiny Vietnamese ones.

Now that we’ve got yam, taro and sweet potato sorted out, what about the difference between roots, tubers, corms and rhizomes? … Maybe another time, my head is spinning already :P.

If you’re dying to pursue this line of inquiry further, do have a look at this page from S. J. Kays at the University of Georgia on Cultivated Edible Root, Tuber, Rhizome, Bulb and Corm Crops of the World, which includes a list of the most commonly cultivated root and tuber crops with their names in sixteen different languages (and botanical name, of course), photographs and even bibliographies of the latest scientific publications on each variety. From a more culinary perspective, the Cook’s Thesaurus on ‘Sweet Potatoes & Yams‘ as well as on ‘Tubers & Corms‘ are a good reference.

P.S. Maybe you’ve guessed already, my favourite rhizome is wasabi (^_*)!